Premier Aquatic Services is excited to announce that we will be hosting the Aliso Viejo Kick Off Carnival Saturday, March 7, from 11- 1 p.m. The carnival will be hosted at the Aliso Viejo Aquatic Center parking lot.
We will have bounce houses, balloon artists, face painting and food trucks. Come enjoy fun filled activities for the whole family and learn about our swim programs!
ALISO VIEJO OPENING DAY
Premier Aquatic Services’ swim program will begin on Monday, March 30.
We offer a wide variety swim lessons for children and adults of all skill levels. We even have parent and me classes for children under three! For more information about the swim programs we offer visit the aquatic services section of our website.
The Aliso Viejo Aquatic Center opens to public on Saturday, May 2.
WE ARE HIRING
Premier Aquatic Services is currently hiring lifeguards, swim instructors and management staff! If you are interested in working with us please apply through the employment section of our website.
If you are a good fit for our company we will contact you to arrange an interview.
We look forward to seeing you at the events around our community!
At one point or another, most children are afraid of the water – especially putting their head under water. The earlier you expose your child to the water, the more it will help prevent them from fearing it.
Below are six steps to help your child conquer their fear the water.
Step 1:
Bring your child to the side of a pool without any water wings or flotation devices. These tools can give your child a false sense of security and will lead them to develop the habit of not going in the water without the aids.
Step 2:
Have your child touch the water and demonstrate to them that water is safe and won’t hurt them. You can also encourage them to splash the water to show them that water can be fun.
Step 3:
Have your child blow bubbles into the water using his or her mouth. You can do this by having them get into the water with you and showing them how to blow bubbles. If they are still afraid of entering the water, you can have them lay on the edge of the pool and blow bubbles without being fully submerged.
Step 4:
Playing games is a great way to get your child acclimated to the water. Start by throwing sinking toys into the shallow end of the water and having your child reach down to retrieve them. As they become more comfortable with the water, you can gradually throw them into deeper areas of the pool. Keep doing this until they are comfortable with putting their head completely under water to revive the toys.
Step 5:
Getting your child to float on their stomach or back can difficult. Start by providing support by placing your hand under your child’s stomach or back. As they begin to become comfortable with floating, remove your hand so that they are floating without assistance. Once they are comfortable with floating on their stomach, try adding in basic kicking and arm movements while you give them support by holding their stomach.
Step 6:
Stand close to the edge of the pool and have your child push off of the wall or jump into the water to you. After they have successfully reached you, back up a little and try it again. Take progressive steps backward until they are using basic kicking and arm movements to reach you.
Gradually your child will gain more confidence in the water, and once they properly learn how to swim they will be able to swim confidently in a pool on their own.
At Premier Aquatic Services, we specialize in acclimating young children to the water and teaching them to be safe swimmer. We even have parent and me classes for children younger than 3-year-old.
Most of the time, drowning is completely preventable, especially with young children. There are many resources available to teach parents and their children about water safety.
Parents often believe that the only way for a child to drown is in a swimming pool, but this is not true. There are other water hazards that your child faces, and it is important to know where your child is most likely to drown to help you prevent it.
Infants: 0 to 12 months
Bathtubs pose the greatest danger for infants less than a year old. Bath seats, even the ones with the suction cups, are not always safe. Babies are still prone to rolling or even falling out of the bath seat. Just because your baby can sit up in the bathtub does not mean it is safe to leave them alone.
Solution:
Do not leave your child alone in the bathtub until they have had swim lessons and can comfortably swim in a pool.
Children: 1 to 5 Years Old
Children one to five years old have the greatest chance of drowning in a swimming pool. Children often believe they can swim better than they actually can or are unaware of the depth of the pool.
Solution:
Enroll your child in swim classes as soon as possible. There are parent and me classes available for children younger than three years old. Once your child reaches three, they are often mature enough to enroll in private, or group swim lessons.
Set strict rules for your child to follow when they are around the pool, such as always having to have an adult present before your child enters the pool.
Drowning is Preventable
The water should be a place that both you and your child enjoy. It is important that you start getting your child comfortable with the water as soon as possible.
The best way to prepare your child for water safety is to enroll them in swim lessons. There are swim classes for children of all ages available.
When selecting a swim school for your child or yourself, it is important to make sure that you choose a US Swim School Association approved facility.
The United States Swim School Association (USSSA) was founded in 1988 to provide a trade association for swim schools in the United States. This was the first ever organization that connected swim schools across the country. Today, the association has more than 400 members in the United States and 25 international members.
The USSSA ensures that members of the association are held to the highest standards so that parents and students are provided with a reliable and trustworthy resource when searching for a swim school. By choosing a school approved by the USSSA, parents can be sure that their child is attending a school that is safe and CPR/AED certified.
Members of the USSSA are also regularly updated on the latest techniques for teaching children how to swim. The US Swim School Association issues an exclusive swim lesson curriculum to their members. This is the curriculum has been used to teach thousands of children how to swim. It is a proven method that is continually being improved.
Children who enroll in a USSSA approved swim school will learn at faster rate and develop the correct techniques without picking up improper swimming habits.
Premier Aquatic Services is a proud member of the US Swim School Association and we offer swim classes throughout Orange County. Find a swim class near you today.
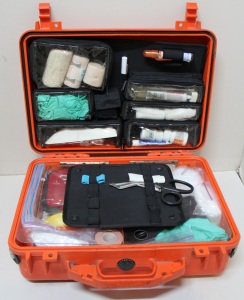
Having a well-stocked first aid kit is important. Whether it is in your home or your car, having a first aid kit nearby is essential to be prepared for an emergency.
Good kits come in many different shapes and size and often have a variety of different items. There are many places where you can purchase complete first aid kits. (We even sell them at our corporate office if you are interested in purchasing one.)
But whether you purchase your kit or choose to make one yourself, it is important that you make sure it contains a few essentials.
Make sure your first aid kit contains these five items:
Antiseptic Wipes
Antiseptic wipes help to reduce the risk of infection and expedite the healing process. They are ideal for cleaning wounds when rubbing alcohol is not available. These wipes usually come in small individual packets and the single-use design helps eliminate the worry of cross contamination.
Bandages
Adhesive bandages should be a part of any first aid kit. They can be used to cover a wound and protect it from dirt, water, and germs that could cause an infection.
Latex Gloves
If a victim is bleeding, it is necessary that you create a barrier between your hands and the victim’s wound to prevent yourself from coming into contact with their blood. Putting on gloves is one of the first things you should do when helping a victim. Having a spare pair of latex gloves will ensure that you are always protected.
Gauze Pads
Gauze pads are sterile, absorbent pieces of cloth or polyester that help clean wounds and reduce the risk of infection. Gauze can also be used to stop excessive bleeding, and the pads are able to cover larger wounds than a bandage.
Breathing Barrier
If CPR has to be performed, you will want to have a breathing barrier available in your first aid kit. This barrier protects the rescuer by preventing him or her from coming in direct contact with the victim’s mouth.
When putting together a First Aid Kit, make sure that you have included these items. This is the first step in being prepared for an emergency. However, having a properly stocked first aid kit is often not enough. It is also important to make sure that you have proper First Aid and CPR/AED training.
If you are interested in signing up for a Red Cross certified first aid class, visit our website for a list of appointments.
First Aid and CPR/AED classes are valuable for anyone, but especially parents. Learning these life-saving skills is essential for keeping yourself and your loved ones safe during an emergency.
One of the skills that you will learn during a First Aid class is how to help a victim that is bleeding.
Approaching the Victim
When approaching a victim who is experiencing major bleeding, you should immediately call 911 and put gloves on your hands.
If gloves are not available, make sure there is a barrier between your hands and the victim. You want to prevent yourself from coming into contact with the victim’s blood.
Look For An Object
Next, you will want to inspect the wound for any foreign objects. Look for anything that could have punctured or penetrated the victim.
If an object has penetrated the victim’s eyeball, do not remove it. Instead, you will want to hold the item in place to prevent it from moving and causing further injury to the eye. Make sure that you do not apply pressure or a bandage to the eye. Hold the object in place until medical help arrives.
If the object has penetrated another part of the victim’s body and looks like it may have hit a major organ, or if it has deeply punctured the victim, do not remove the object. Instead, stabilize the object by taping or holding it in place until medical help arrives. Make sure you splint any limbs involved to prevent them from moving.
If the object has fallen out or has already been removed, always check to see if a part of the object is still inside the wound. If so, make sure to leave it in place and have a doctor remove it later. Any small object that is visible or sticking out of the wound can be removed with clean tweezers. After removal, pressure should be applied to the wound.
Apply Pressure
After the object has been removed or if there isn’t an object present, you will want to apply direct pressure to the wound with gauze. If gauze is not present, you can use a clean article of clothing to help stop the bleeding.
Hold the gauze or clothing on the wound until medical personnel arrive. If more gauze or clothing is needed, do not remove the first layer, simply keep adding more layers of cloth on top.
Familiarizing yourself with these steps is important, but there is no substitution for taking a First Aid class and learning essential life-saving skills. We offer several first aid classes throughout the month. Make sure you know how to keep your family safe by enrolling today!
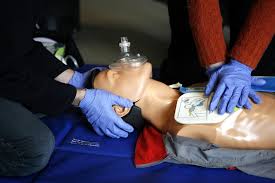
If an emergency occurs and someone needs mediate medical attention like CPR, the odds are not in their favor. A study from Duke University finds that only 3.5 percent of people each year are properly trained in CPR.
Cardiopulmonary resuscitation, commonly known as CPR, is a lifesaving technique that can be administered to someone during an emergency. CPR is commonly used on a person who has drowned or experienced a heart attack, causing their heartbeat or breathing to stop.
During each minute that CPR is not initiated with someone who has stopped breathing or does not have a pulse, survival rates drop by 10 percent.
The American Heart Association recommends that any bystander should take action if someone is in need of CPR. Even if you aren’t confident in your ability or fearful of your knowledge about CPR, you need to take action.
The difference between acting and not acting could be the deciding factor in saving a person’s life.
If you are untrained in CPR – or, even if you are trained but rusty – the American Heart Association recommends that you provide hands-only CPR at the rate of 100 chest compressions per minute to any adult needing CPR.
However, before you begin chest compressions make sure that someone has called 911. The proper way to perform chest compression is as follows:
1. Put the person on his or her back on a firm surface. 2. Kneel next to the person’s neck and shoulders 3. Place the heel of your hand over the center of a person’s chest between the nipples. Place your other hand on top of the first hand. Make sure you keep your elbows straight, and your shoulders should be positioned directly above your hands. 4. Use your upper body weight to push straight down on the chest. You will want to make sure you push at least 2 inches deep. 5. Continue chest compressions until there are signs of improvement or until trained emergency medical personal can takeover.
Remember, performing chest compression is only a single step in successfully performing CPR during an emergency. You will need to be formally trained in CPR to be able to add the breathing component. Also, chest compression is performed differently on a child or newborn than stated above. If you have a child or newborn in your life, please seek proper training.
Don’t be one of the 96.5 percent of people who wouldn’t know what to do during an emergency. Empower yourself by registering for a CPR/AED and First Aid class today and help save someone’s life.
We offer CPR classes every month! Browse our online calendar to register for a class that fits your schedule!
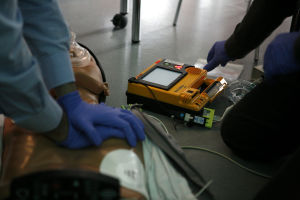
An automated external defibrillator (AED) is a portable device that checks a person’s heart rhythm and sends an electric shock to the heart in an attempt to restore a normal rhythm.
How The Heart Works
Inside the heart there is an electrical system that regulates the rate and rhythm of the heartbeat.
An average resting adult’s heart beats 72 times per minute. Each time a beat occurs, an electrical signal spreads from the top of the heart to the bottom, causing the heart to contract and pump blood.
When a problem with the heart’s electrical system occurs, this causes an irregular heartbeat and can trigger a sudden cardiac arrest (SCA).
How An AED Works
An AED should be used on someone who could possibly be having a sudden cardiac arrest. When an SCA occurs, death can follow if the problem is not treated within minutes.
Automated external defibrillators are lightweight, battery-operated and portable devices. Each AED package comes equipped with electrode pads, a CPR mask, a first aid pack and the AED Unit.
Once the AED is turned on, a voice prompts you with directions on how to use the device. Before using it yourself, you should always check to see if there are any trained CPR/AED personal in the area. If so, leave the operation of the device to them.
An AED is safe to use and there have been no reported instances where the device has administered an inappropriate shock or harmed any bystanders.
Training To Use An AED
According the Red Cross, AEDs can be credited for saving thousands of lives each year. Automated external defibrillators can now be found on a majority of high school campuses and in sports complexes across the country. These devices are becoming common pieces of lifesaving equipment.
Now that automated external defibrillators can be found in most public areas, it is more important than ever that you know how to properly operate one.
Sign-Up for one of our CPR/AED classes today to be trained how to efficiently use the device. We also sell the only AEDs on the market that provide live CPR feedback for the user.
IMPORTANT: You will not be able to participate in the classroom portion of the class without a completed certificate from the online portion. Failure to complete the online portion will mean you will need to pay for the course again.
Choose different class
I understand
While this may reduce your time in a classroom it also requires you to do the following prior to attending the in-person portion of your training:
Complete online blended learning course through the American Red Cross
Obtain an online completion certificate and bring it to the in-person skills portion of the class